
This guide explains what branches are and how branches in Git works.
Most of the stuff is general in nature. But we also compares it to branching concepts found in TFS (Old) Version Control. Those parts are of course mostly intended for the developers making the transition from TFS VC to Git, and in particular those using Visual Studio 2019.
From TFS VC to Git : Background
You don’t do branching in TFS VC without careful consideration. It means a new folder structure, somewhat in parallel with the source folder you want to branch from. You need to think of what builds you want to run on the branch, because you must clone those you have. Cloning these are copies, so you increase your build maintenance for every branch you make. If your project is large, you must have a clear convention for naming the branches, since they are costly to create and maintain. You must think of the relationship you want between your branches, because merging between non-parent-child related branches is messy. And with many branches, every download of code from these means a complete new full download. Not so bad with small codebases, but with large codebases it can really take time. And if you get many branches, keeping track of how they relate and what is done in each is no small task.
So those coming from a TFS VC environment have got a mental image that branching is hard, and many also tend to say that one should avoid branching all together, and not without reason.
Git branching concepts
Concept #1: A branch is a pointer
Enter Git: Git has a very (c)lean (and mean) branching model. In Git a branch is nothing but a pointer to a commit (aka checkins in TFS VC).
Read that again: Just a pointer to a commit.
This is the 1st central concept.
If we start a new project and do a couple of commits:
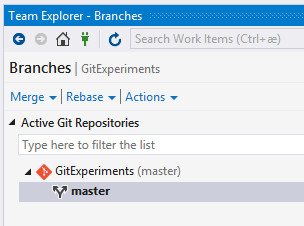
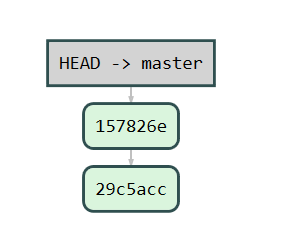
It then looks like this using Visual Studio, GitViz, and SourceTree respectively
| Visual Studio | GitViz | SourceTree |
|---|---|---|
 |
 |
 |
If we do it using command line, you could add something to indicate the branch you’re on, like PoshGit for Powershell. Otherwise, you must use the git status command to see.
To create a branch:
git branch mynewbranch
Switch between branches:
git checkout mynewbranch
git checkout master
The default mainline branch in git is called master. And HEAD is where the current branch is pointing.
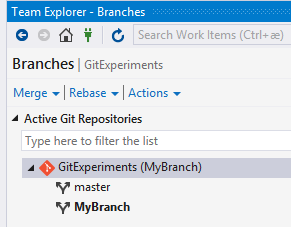
If we now create a new branch “MyBranch” using Visual Studio:
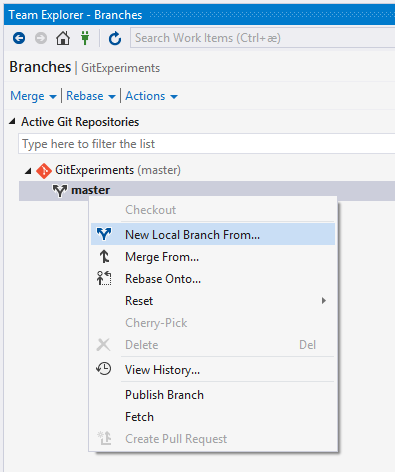
And immidiately we get the following result, there is no copying of files, no folders to make. The creation is instantaneous, since all we do is to create a new pointer.
| Visual Studio | GitViz | SourceTree |
|---|---|---|
 |
 |
 |
The current branch -HEAD - is now pointing at our new branch. This is now showing what is in the workspace we have, see ASurvivalGuideToGit.
Concept #2: Only one current branch
And this is the 2nd central concept. There is but ONE workspace for a repository, and that workspace is ALWAYS showing what is in the current branch. There are no such thing as separate folders for branches. The branches lives inside the repository, and you select one of them to be active, and then workable in the workspace.
This also means that switching between branches in Visual Studio is done in the same Visual Studio instance. If the changes are small this switching is also extremely fast, and often no reloading of any projects are needed.
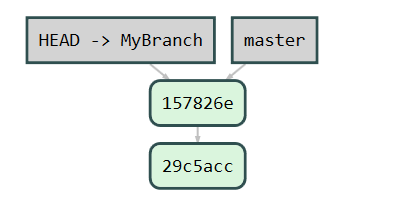
Let us do some changes to the code, and commit that, and then look at how the history looks, using GitViz:
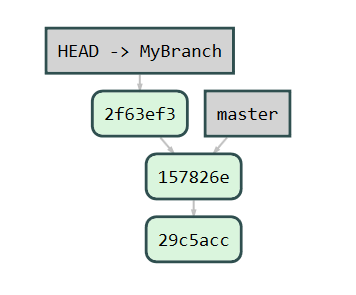
The current branch, MyBranch, now points to the latest commit we did, whereas the Master branch stays with the former. It should now be clearly visible that the branches are just pointers, concept #1.
Concept #3: Branches can be local or remote, and if both, can be tracked/connected.
The last and 3rd important concept is that branches can be either local or remote. You can create as many local branches as you like. They will NOT be moved to the server, but will stay in your local repository.
Again, for the TFS VC people: There is next to no cost for a branch - remember concept #1: It is nothing but a pointer!
When you want to share your branch with other people, then you publish (or push) it to the remote. You will then keep your local branch tracking the remote branch, they will then stay connected.
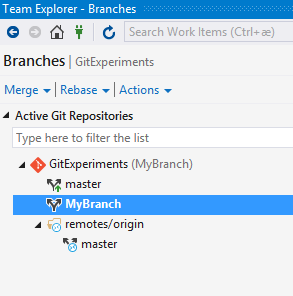
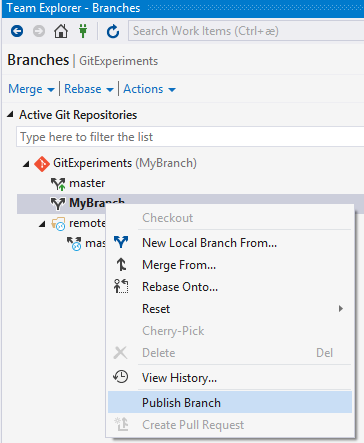
If you have a local branch, and want to publish it, you do it from the same Branches hub in team explorer (where you went to create the Local branch:):
| Before publishing | Publish branch | After publish |
|---|---|---|
 |
 |
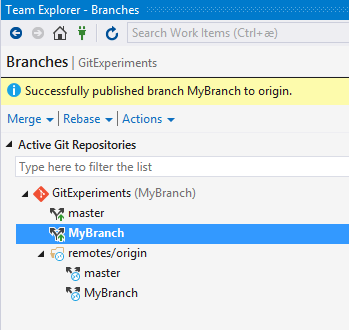 |
Note that the branch is now visisble both directly under the repository Icon, and under the subfolder remotes/origin. Note also that icon for the branch changed, see the “Before publishing” screenshot, that the master branch has a green arrow indicating it is part of tracked pair, whereas the MyBranch doesn’t have this, meaning it is local only. After the publishing it has also got the same indicator, meaning it is also tracked.
Using GitViz again, it now looks like this:
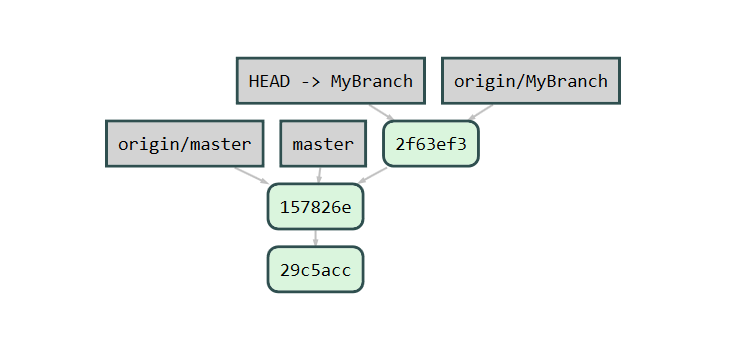
Note that the remote branches also are just pointers to the commits. So each branch is now a pair, one local and one remote. When we use the term “tracked”, we mean that these two pointers are tracking each other. The actual tracking happens when we pull and push commits.
Pulling a tracked branch, moves the local branch pointer to point to the same commit as the remote branch pointer.
Pushing a tracked branch, moves the remote branch pointer to point to the same commit as the local branch pointer.
Builds and git branches
With TFS VC, a build is bound to a given branch folder. Since branches are completely independent of folder structure in Git, a server build for a Git repository can build any branch. This comes in very handy for e.g. CI builds, where you really don’t care which branch is building, you just want to check that it builds correctly on the server.
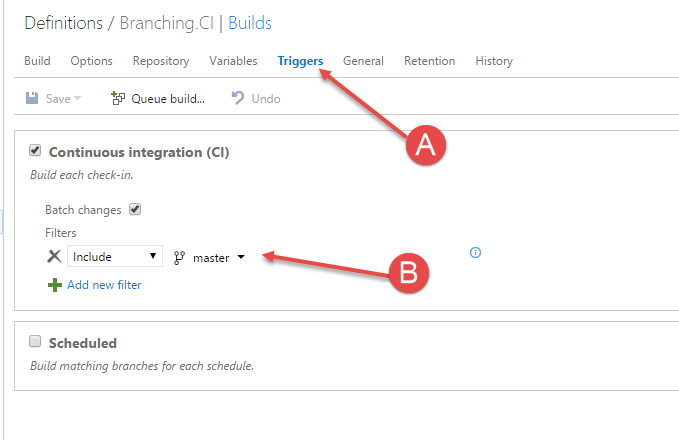
You set it up as: follows (after you have created the build on the server):
| Before | Changing filter | After |
|---|---|---|
 |
 |
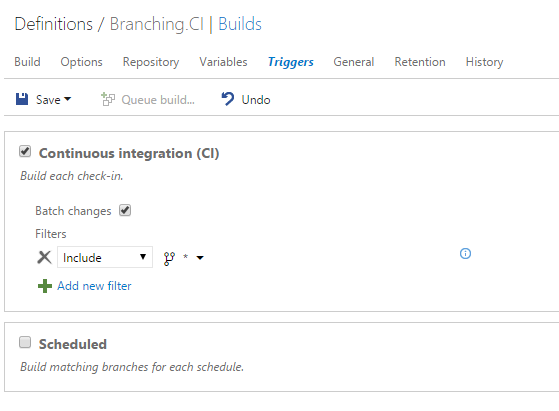 |
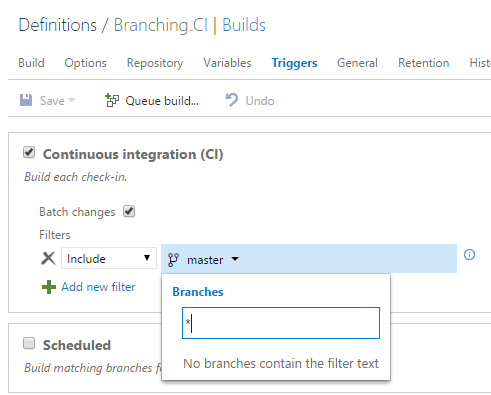
Go to the Triggers menu, and change the Filter, from Master (which is the default) to a simple ‘*’. (It will say no branches matches, but that can be ignored, it should have said that all branches matches).
If we commit and push a change in the MyBranch, the build will be started for that branch. We can see this in the overview for the builds:

The first build was started manually and worked on the master branch, the second was started from the commit in the MyBranch branch.
This means less maintenance of builds, and opens up from a more free use of branches.